|
|
|
UER Store
|
|
 order your copy of Access All Areas today!
|
|
|
 musket boy
   
Location: Maui
Gender: Male

It smells like your grandpa and your feet stick to the floor
 | |  | |  | |  | a guide to basic rope work
< on 1/18/2010 3:56 AM >
|  | | | Knots
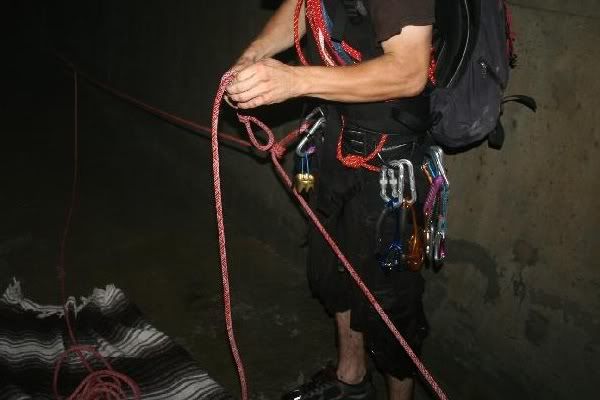
If you're going to be going up and down ropes there's two knots You should definitely know, and those are the figure eight and the water knot. There are other knots you might want to use also but these two are probably the most important.
Here's a good website that explains how to tie all kinds of knots
the figure eight:
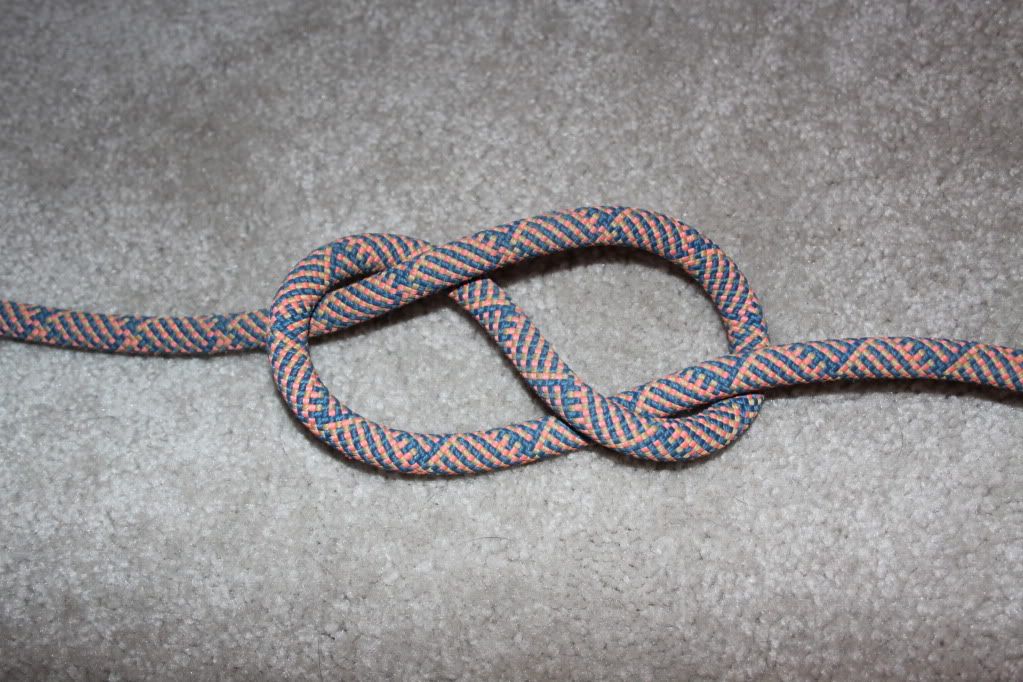
figure eight on a bight:
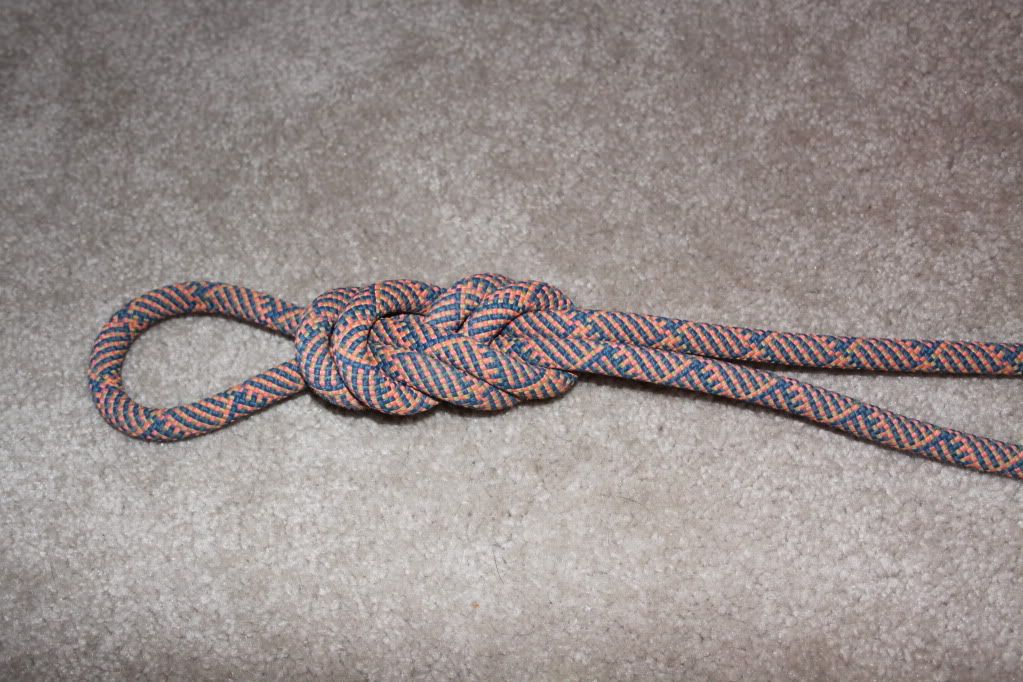
figure eight with two loops:
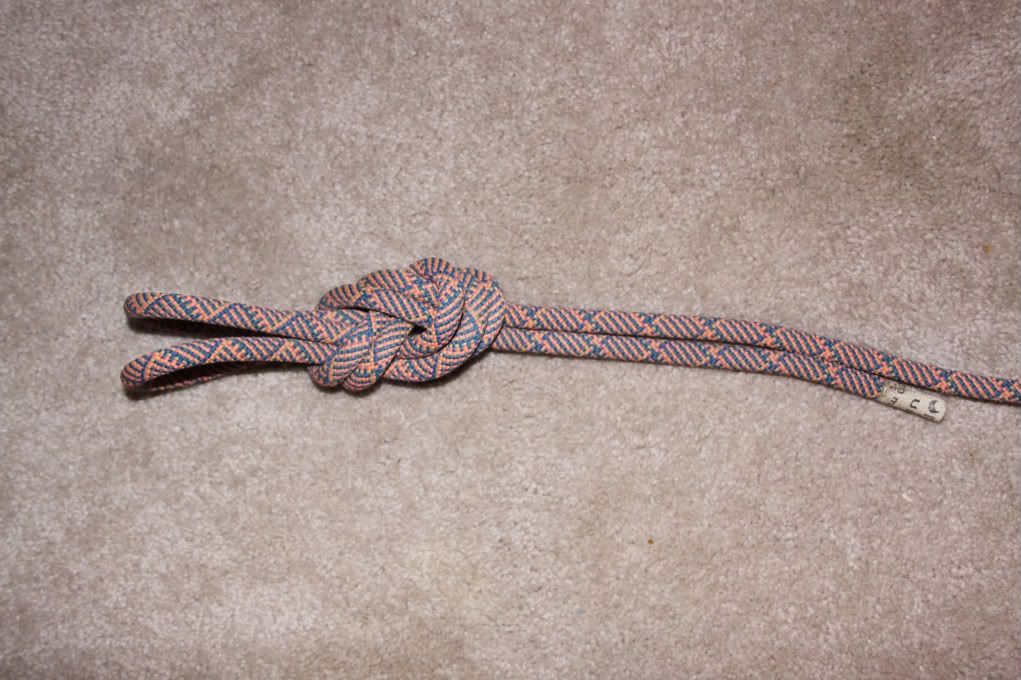
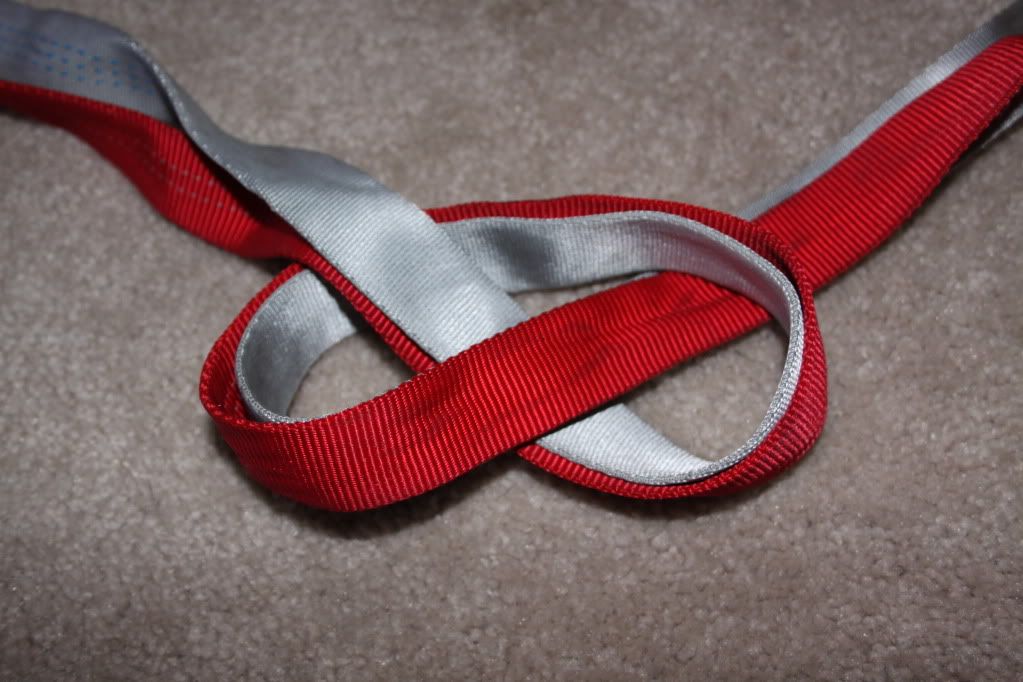
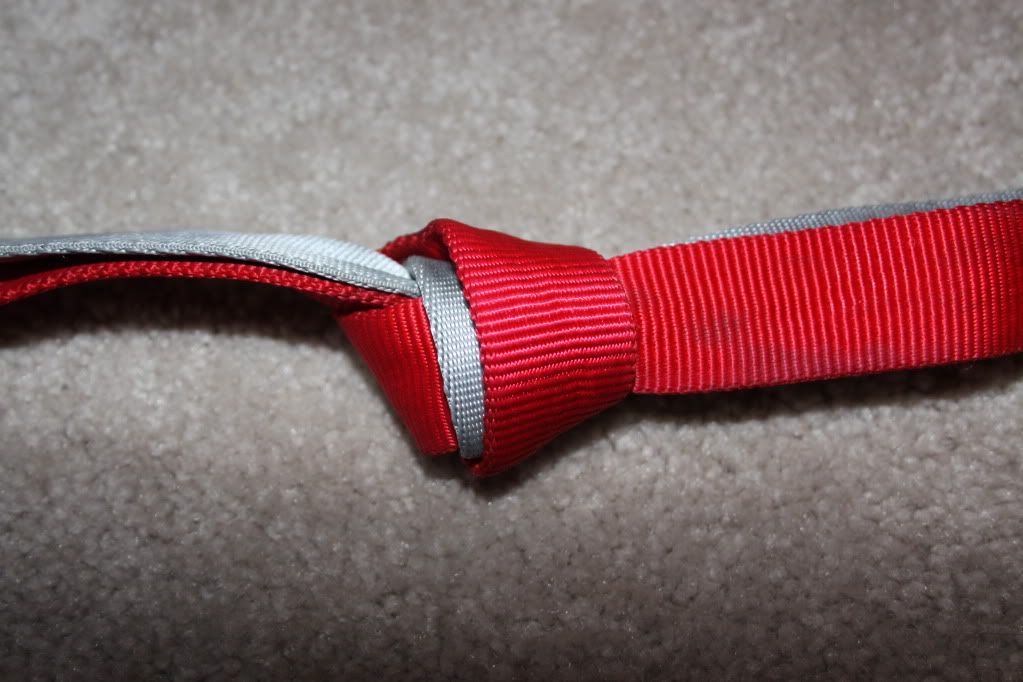
the water knot:
Anchors
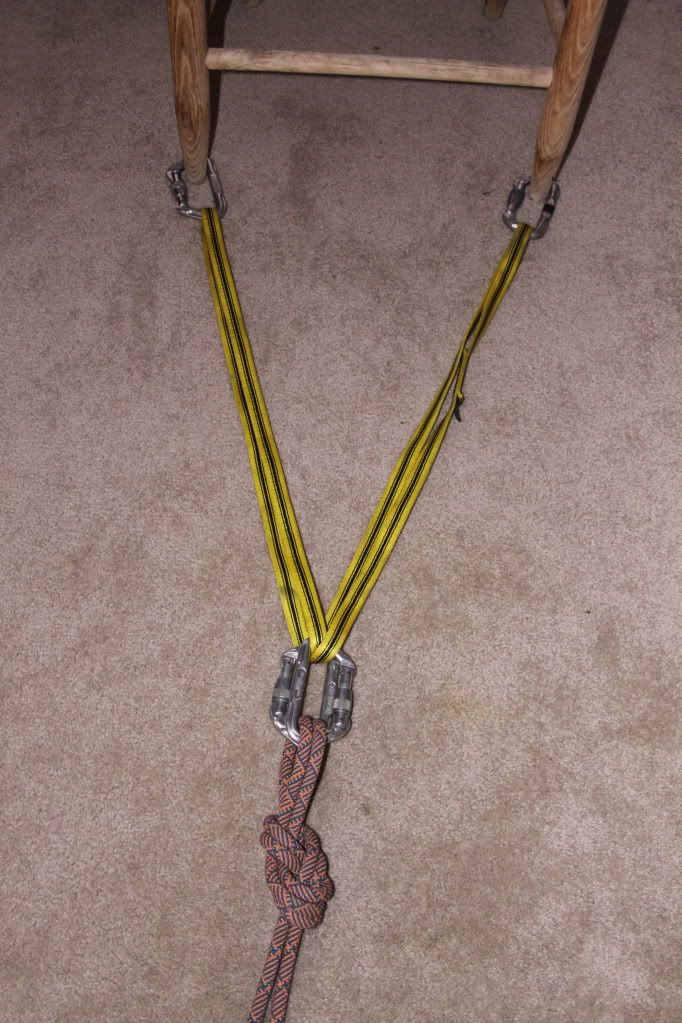
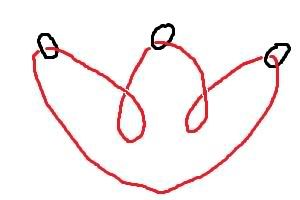
since you need to attach your rope to something its good to know how to set up anchors, the method I use the most is the sliding x which is a self equalizing system that allows you to use two or three or four anchor points. its done like this:
1. select some anchor points, they can be trees, big rocks, hand rails, step irons fence posts... what ever
2. connect them with a sling
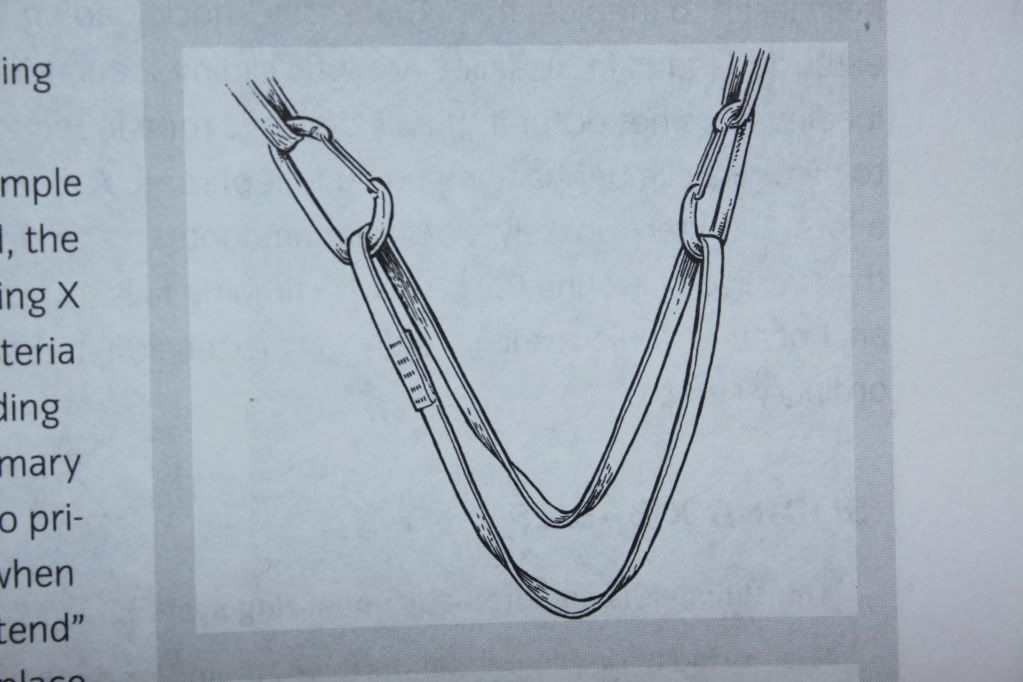
3. put a single twist in one half of the sling
4. clip it
here's what that will look like
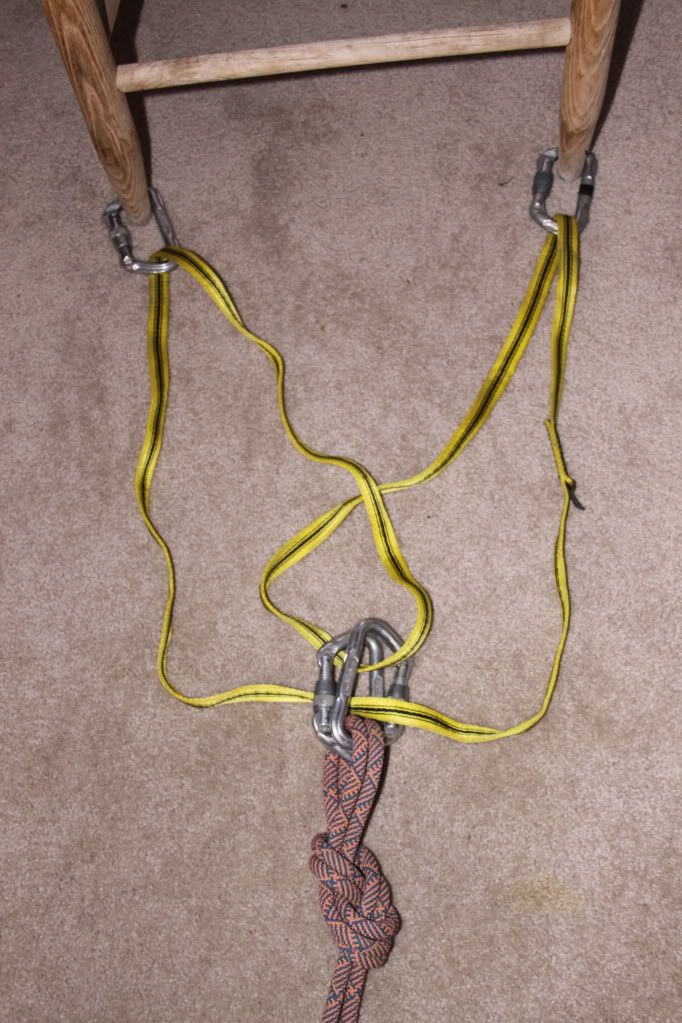 
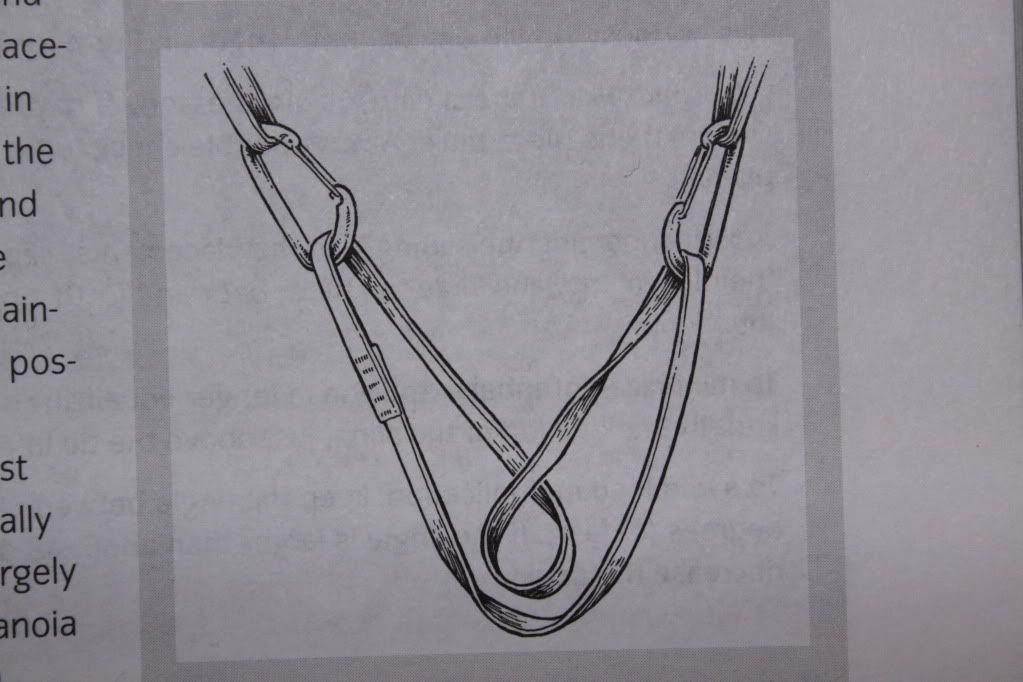
a knot keeps the x from sliding too far and shock loading one anchor should the other fail, but its really only necessary if the anchors are far apart and you're using an extra long piece of webbing or cord
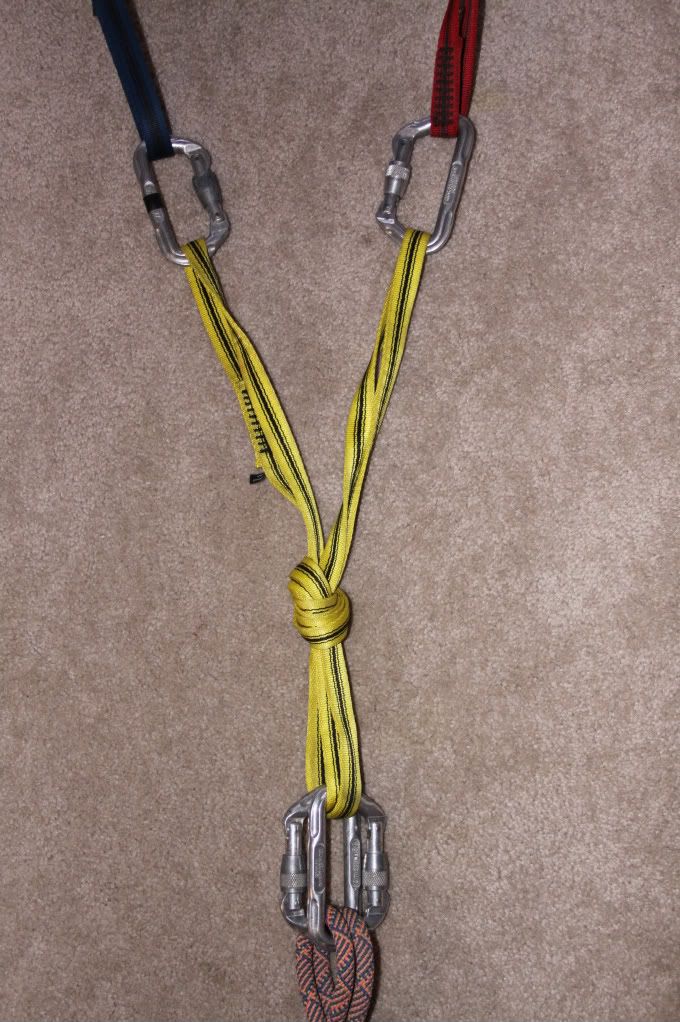
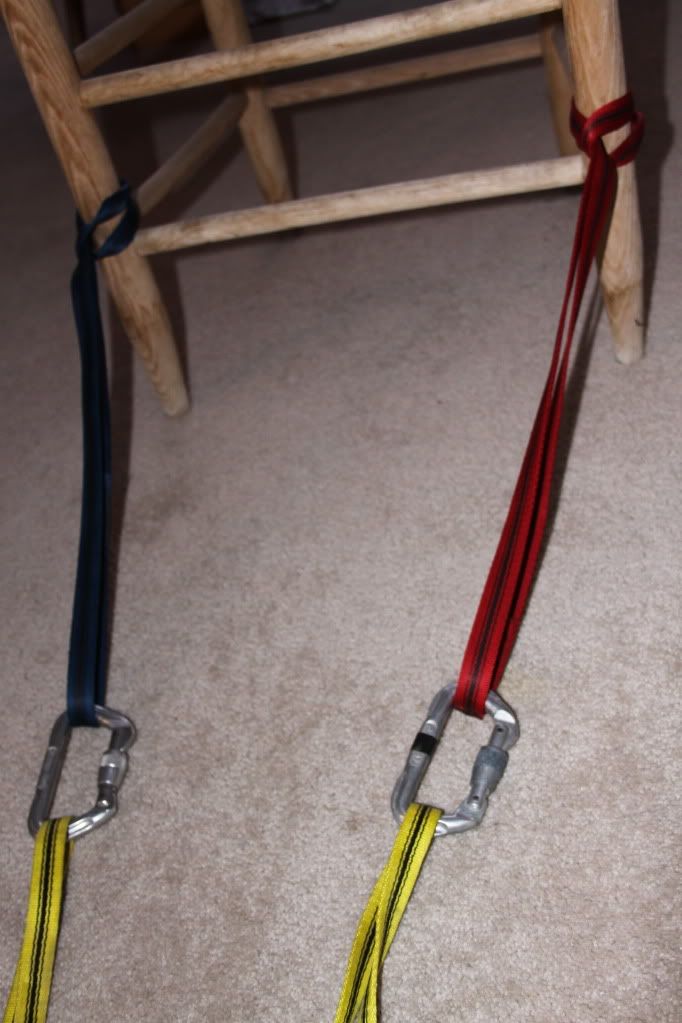
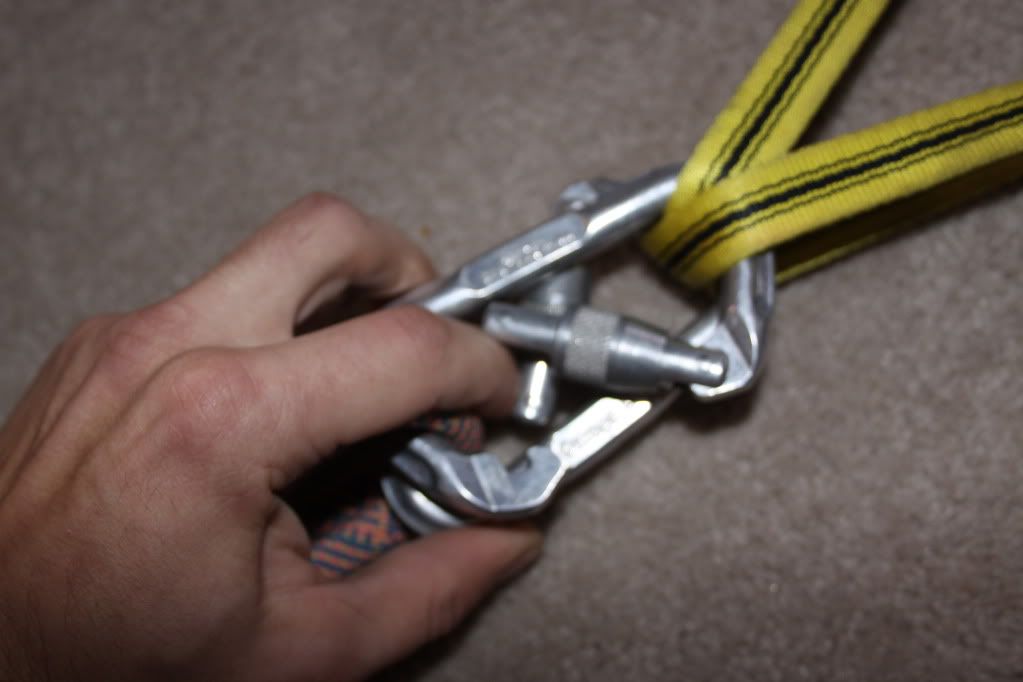
if the anchors are too big to get a carabiner around girth hitch them with some webbing like this
this is a sliding x using three points
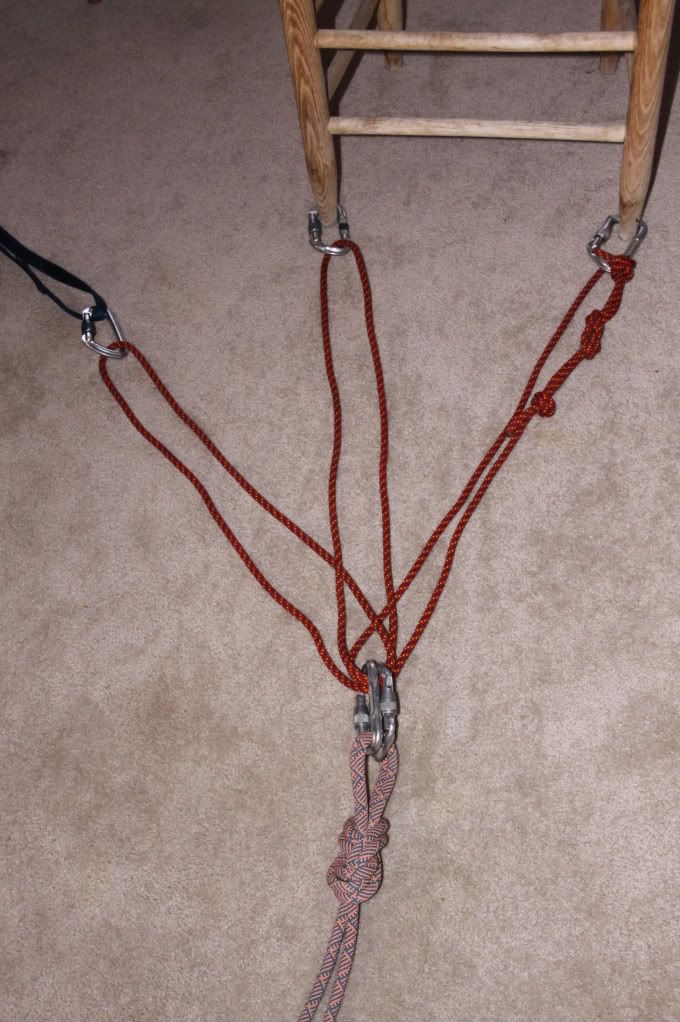 
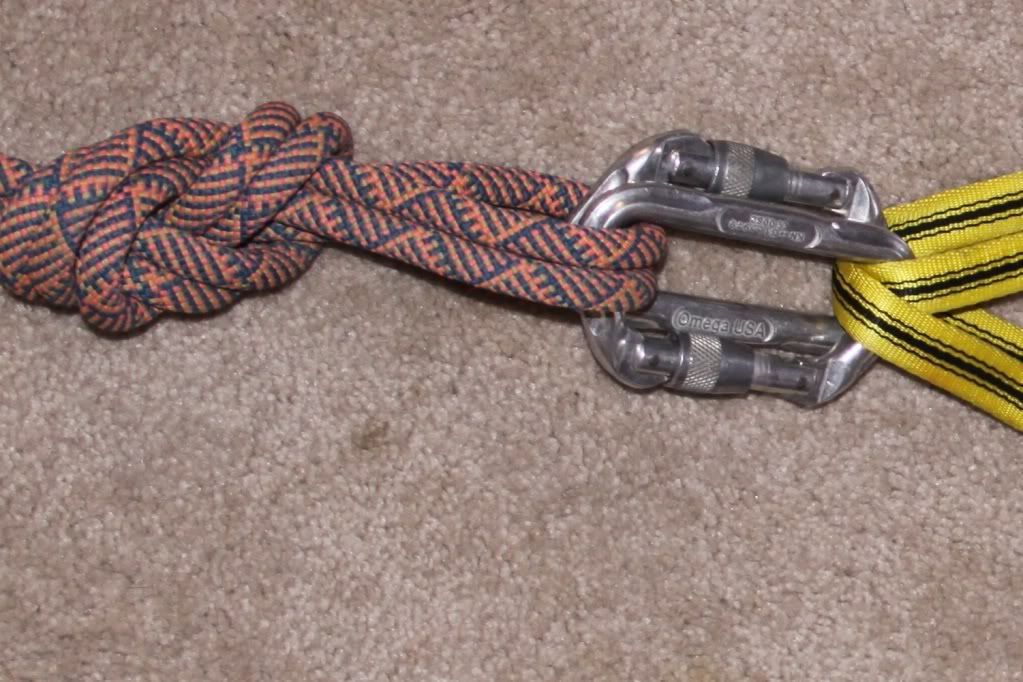
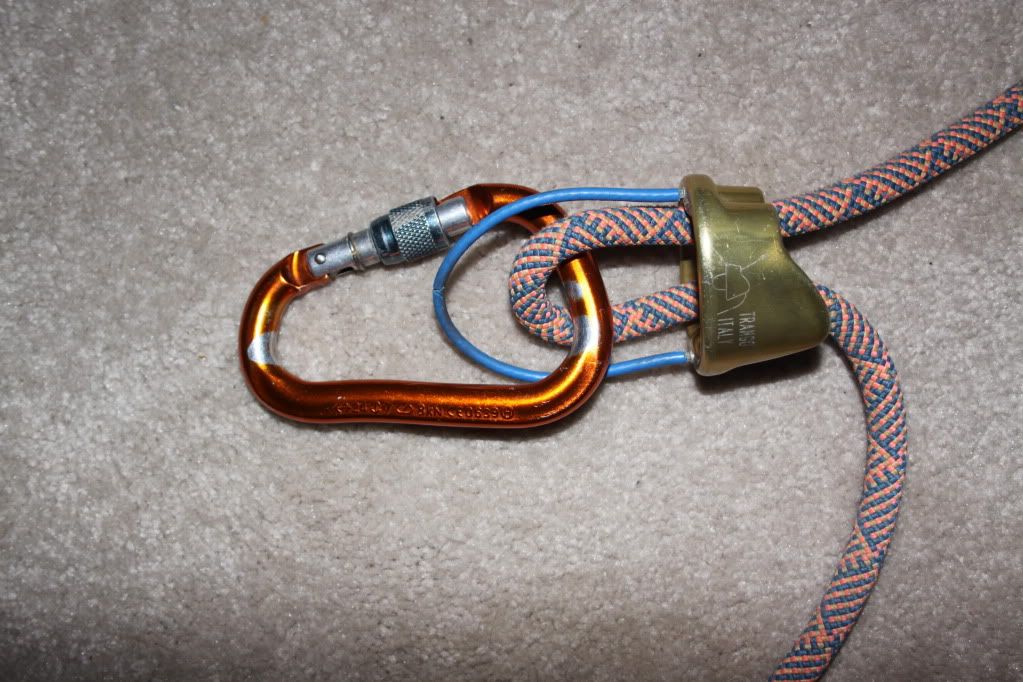
to connect the rope to the anchor tie a figure eight with two loops in its end and clip it into a pair of carabiners with their gates opposite and opposed
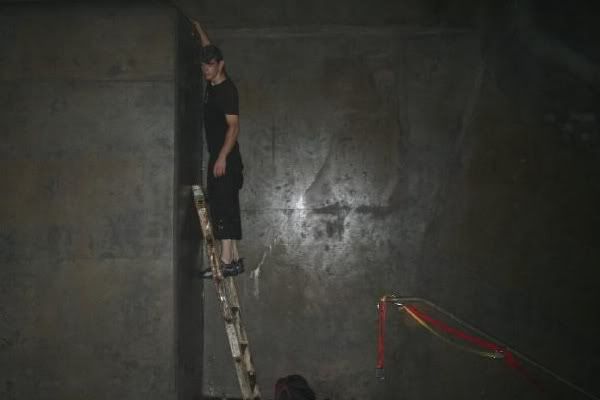
here i tied off to a a railing at three points where it was bolted to the wall using a double sliding x
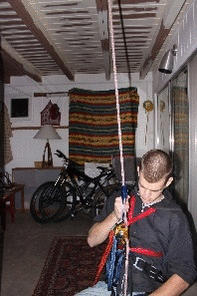
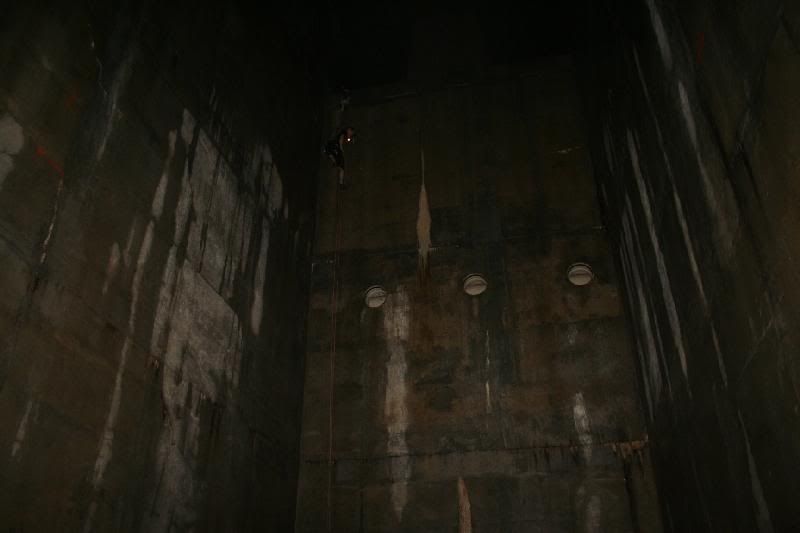
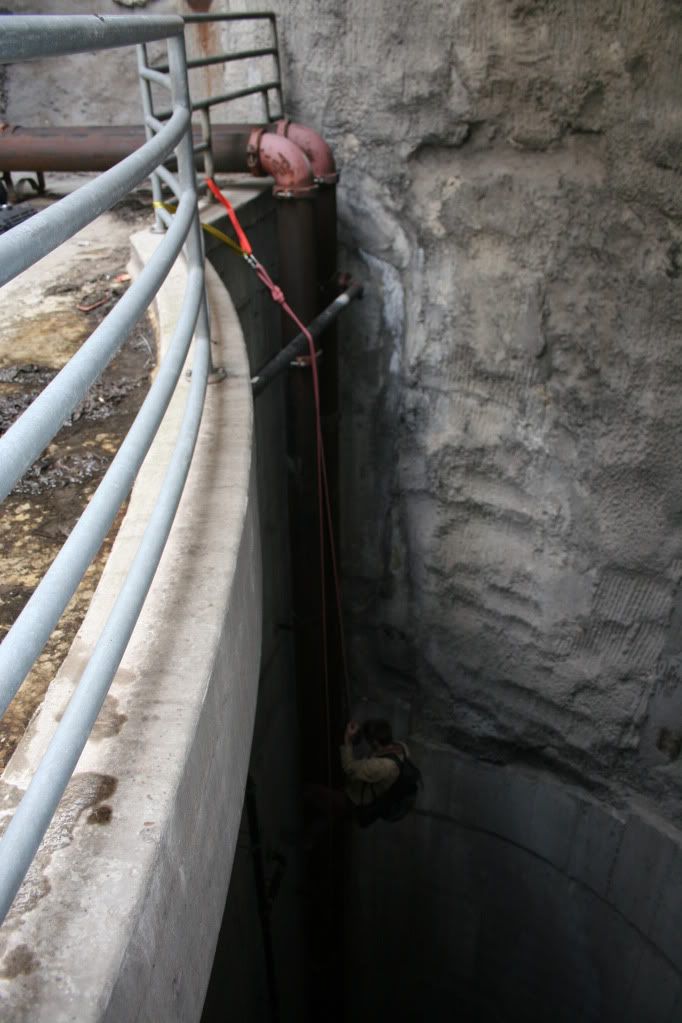
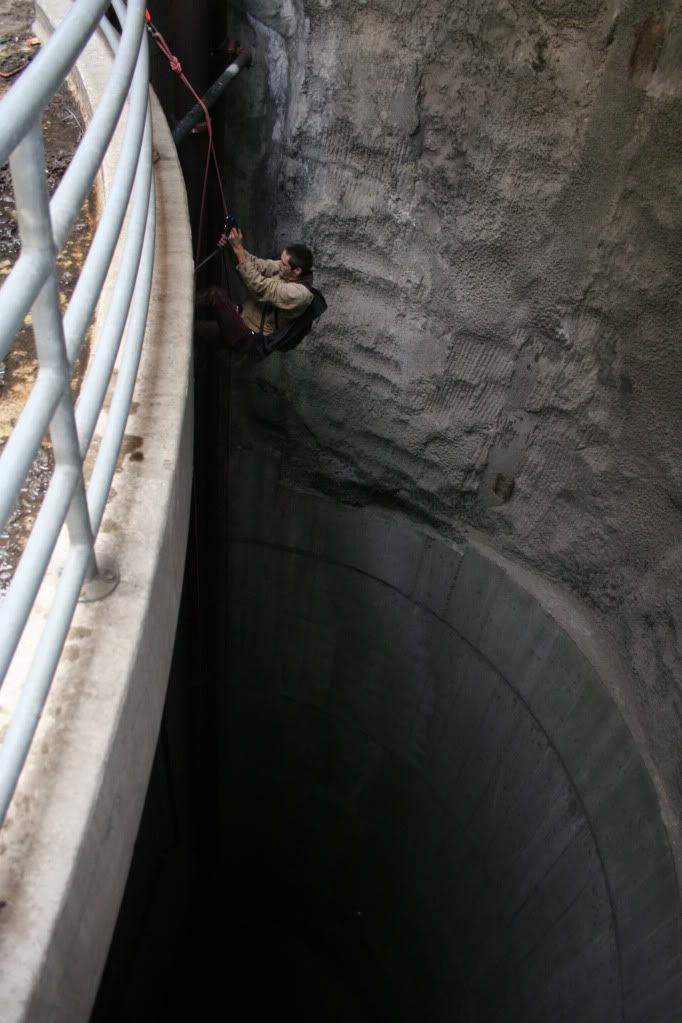
Rappelling
there's too many contraptions made for rappelling to list them all, whatever you're comfortable with is what you should use. I wouldn't recommend an 8 or a munter hitch though because they twist the rope a lot and wear out the sheath quicker, the munter hitch also isn't that good for long distance or heavy loads since it doesn't offer as much friction to slow you down.
while some may argue that an atc is more a belay device than a descender I like it anyway because its cheap ($20) and it works.
with an atc type descender you raise the tail of the rope up do descend and pull it down to slow down or stop
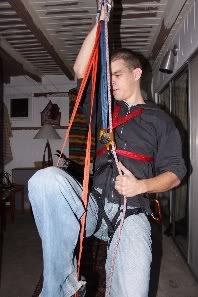
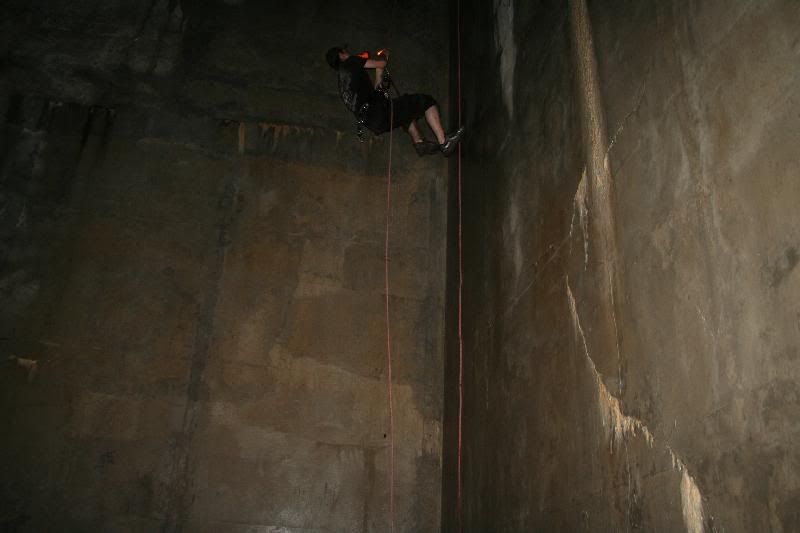
Ascending
the setup:
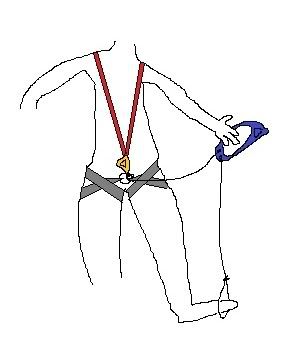
this is called a frog, its a simple and efficient way to climb rope. ideally it would be done with a special frog harness and half round but if all you have is a climbing harness that works (its what i use)
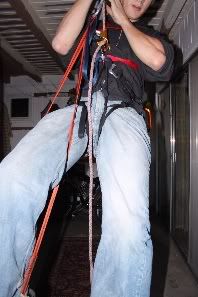
you need real ascenders for this so don't waste your time with prusik knots because you'll end up punching yourself in the face
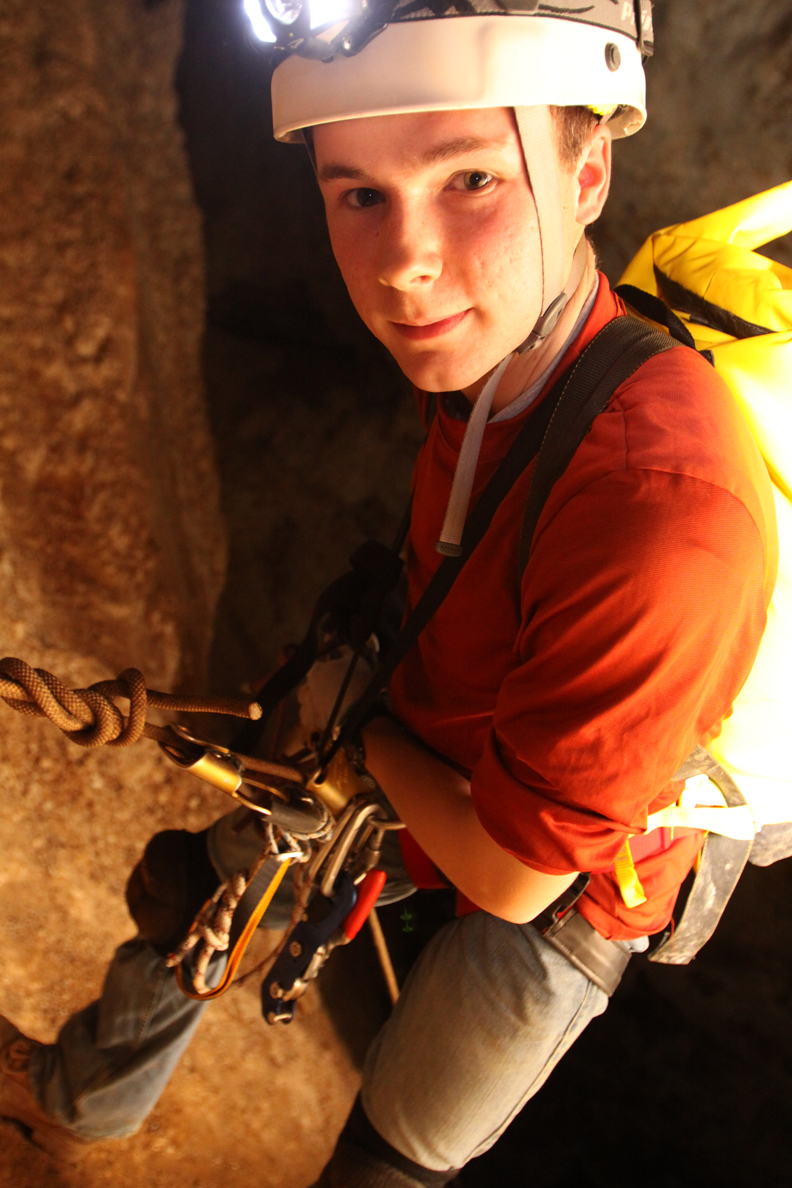
a petzl hand ascender and chest ascender
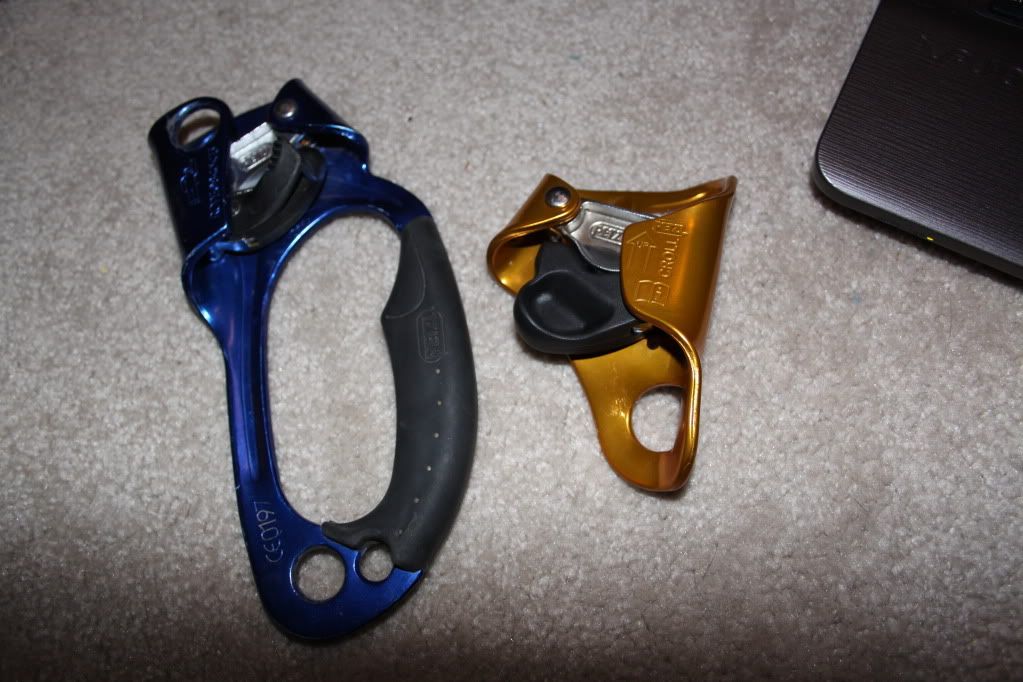
the red webbing "chest harness" I'm wearing in this pic is only there too keep the chest ascender vertical and make climbing easier, its not life supporting and you don't need to buy some expensive chest harness from the store, you can use any kind of webbing to make one, it should be tight enough that its uncomfortable to stand up
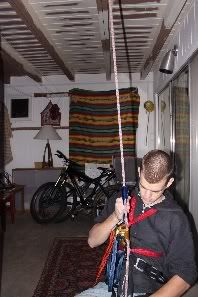
to ascend you hang your weight from the chest ascender and slide the hand ascender up the rope as high as you can reach
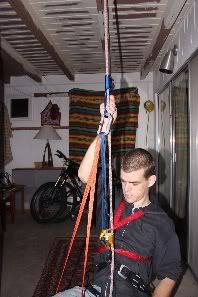
then put your weight on the foot loop which hangs from the hand ascender and stand up on it, the chest ascender will slide up on its own but you may have to feed the rope for the first 10-20 feet until it has enough weight to feed its self
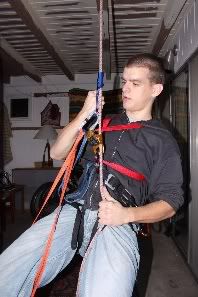
sit and stand, sit and stand
enjoy
DISCLAIMER
Climbing and associated activities are inherently dangerous and potentially deadly. While these pages reference climbing activities, this site and its contributors do not assume any risk or liability for anyone but themselves. All comments, suggestions, recommendations, reports, and content of these pages are to be considered only opinions from non-expert sources unless stated otherwise. Though efforts are made to insure the information presented within is accurate, no guarantees are implied or suggested. Those interested in climbing or related activities should obtain professional instruction from a reputable source, such as a guide, a school, or service.
post pics from your own vertical adventures here


most pics by me, some by Alexplorer, one by Mellon_Collie, some from Climbing Anchors by John Long and Bob Gaines
[last edit 1/18/2010 7:59 PM by musket boy - edited 2 times]
uering |
|
Ashes in the Snow
 
Location: Raleigh, NC
Gender: Male

Ladder Addict
| | | Re: a guide for basic rope work
<Reply # 1 on 1/18/2010 5:48 AM >
| | | | Sweet Pics  I can already tell Repelling/Ascension is going to become an itch that I'm gonna wanna scratch... I can already tell Repelling/Ascension is going to become an itch that I'm gonna wanna scratch...
http://www.flickr.com/kwikstix |
|
jjbigups

Location: Boston, MA
Gender: Male

| | Re: a guide for basic rope work
<Reply # 2 on 1/18/2010 6:52 AM >
| | | | Those locations look pretty hot. Mind sharing what kind of structures they are?
Oh, and though I seriously advise anyone interested in vertical work to LEARN FROM SOMEONE ELSE IN PERSON, your write-up is surprisingly clear. And certainly concise.
[last edit 1/18/2010 6:55 AM by jjbigups - edited 1 times]
|
|
musket boy
Location: Maui
Gender: Male
It smells like your grandpa and your feet stick to the floor
| | | | Re: a guide for basic rope work
<Reply # 3 on 1/18/2010 5:01 PM >
| | | | Posted by jjbigups
Those locations look pretty hot. Mind sharing what kind of structures they are?
|
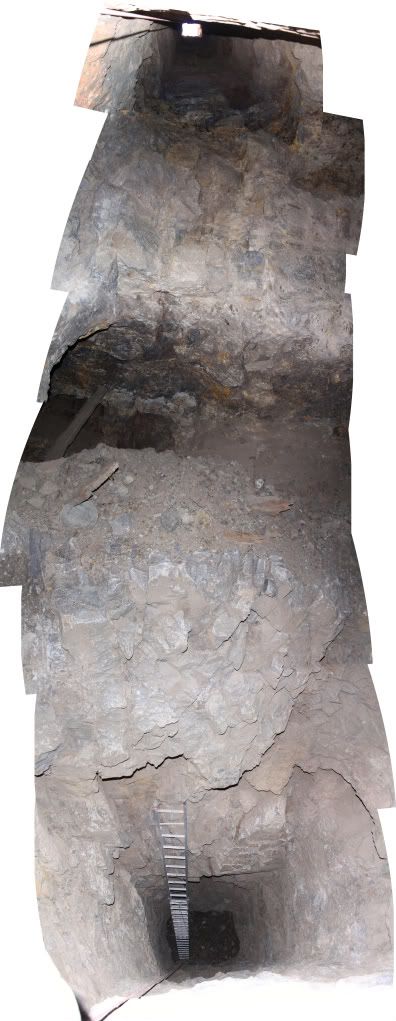
first ones the intake for an underground reservoir, subway tunnel, mine, another mine, Carlsbad Caverns.
Oh, and though I seriously advise anyone interested in vertical work to LEARN FROM SOMEONE ELSE IN PERSON, your write-up is surprisingly clear. And certainly concise.
|
good advice
uering |
|
terapr0
  
Location: Sauga City
Gender: Male

www . tohellandback . net
| | | Re: a guide to basic rope work
<Reply # 4 on 1/19/2010 4:27 PM >
| | | | great writeup and cool pics...thanks for taking the time to put that together...
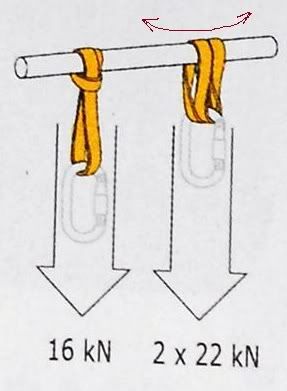
my only additions to what musketboy said would be a reminder to always back up the tail of your figure 8 with an overhand knot and a suggestion to NOT girth hitch your webbing straps to an anchor. Girth Hitching degrades the breaking strength of a nylon webbing strap by 30% (up to 50% with thin Dyneema slings) and should never be used.
The authors of On Rope say that while there are uses in which girth hitching is acceptable (climbing a flag pole, arborist false crotches), they are unacceptable for use as a component in a mainline anchor system. You're much better off wrapping the webbing around your anchor and clipping through both ends (almost 4x stronger than a girth hitched joint). Better still - use a wrap 3, pull 2 type anchor in order to generate the maximum load rating from your equipment.

Some people may say that "16kN is still plenty"...and you're right...its over 2000lbs. That being said, its just as easy to employ a higher-strength attachment method, and when your life's on the line, you might as well be as safe as possible.
my $0.02
climb safe!
[last edit 1/19/2010 4:28 PM by terapr0 - edited 1 times]
www.tohellandback.net |
|
musket boy
Location: Maui
Gender: Male
It smells like your grandpa and your feet stick to the floor
| | | | Re: a guide to basic rope work
<Reply # 5 on 1/19/2010 4:40 PM >
| | | | Posted by terapr0
Some people may say that "16kN is still plenty"
|
for rappelling and ascending it is, but you're right if i was expecting a big fall like in lead climbing i would use the other method
also consider that the sling configuration can slide side to side while the girth hitch is more secure, that might or might not be an issue it just depends on the situation
[last edit 1/19/2010 4:55 PM by musket boy - edited 2 times]
uering |
|
Therrin

This member has been banned. See the banlist for more information.
Location: North of Chicago, IL
Gender: Male

*Therrin puts on the penguin-suit
| | | Re: a guide to basic rope work
<Reply # 6 on 1/27/2010 4:04 AM >
| | | | Woohoo! Looks like I just found the folks with my type of equipment handling appreciation.
Btw, very well written thread Musket boy.
In my industry we're required to use auto-locking biners for any life-supporting line work, but as for screw gates, "screw down so you dont screw up". This goes with always running the spine of a carabiner against whatever surface your anchor is, so the gate is facing OUT (ie, not able to be rubbed at by the anchor material), and screw the locking gate so it's locked when in the "down" position. This way a loosely locked gate cant 'unthread' itself and slide down to unlock the gate.
Always beware of laterally loading your biners. They werent designed to be loaded that way, only along the major axis of the biner. Some mallions are different, like triangles and D's and other things.
Always try to test an anchor point before you suspend your full weight on it. If you're anchoring to rusted metal stanchions of some type, spread out the weight by using the anchoring techniques he described at the beginning of this thread.
For mine-shaft solo work when I was out in Az, I created a "ground anchor". This is basically a 1" thick piece of round steel bar, pointed on one end, reinforced with 2 pieces of rebar welded to it with a screw mallion welded near the top.
You bring a small sledge to pound it into the ground opposing the angle of your descent, and you can clip into it when no other anchor material is viable.
Two of the other knots you should likely know besides what he already mentioned are the bowline and the prussik.
A bowline can be easily tied in several different configurations, and the great thing is that even after intense loading can always be easily untied. I use the bowline-on-a-bight in the "yosemite" config most often, because it's backed up that way.
Prussik knot tying skills allows you to easily make a dead-man backup for rapelling, or an easy set of ascenders out of cordage rope which is smaller diameter than your climb line.
While rapelling single-line with a prussik backup, if your lose your grip on your brake hand for any reason, the prussik will pull tight and hold you in place. To rapell with it you simple hold onto it with your free hand and it slides along the rope as you go.
My personal favorite for LONG rapells, is my descending rack. (aka rescue rack). It can handle dual ropes, or large diameter ropes like my 5/8" rigging line. Also it's designed to be easily tied off, can vary the amount of friction you apply by popping "hyper bars" in and out, doesnt twist the rope, and is rated to 20,000lbs static load limit.
Give a person a match and they'll be warm for a minute, but light them on fire and they'll be warm for the rest of their life. =) |
|
Therrin
This member has been banned. See the banlist for more information.
Location: North of Chicago, IL
Gender: Male
*Therrin puts on the penguin-suit
| | | Re: a guide to basic rope work
<Reply # 7 on 1/27/2010 4:10 AM >
| | | | Here are a few great links on knot tying, and other good info to know with this type of equipment.
http://www.caves.o...h/50/knotrope.html
http://www.animatedknots.com/
This last link is where I purchase all of my arborist gear. Keep in mind its mostly the same equipment, by the same manufacturers, as you'd find in the rock climbing and rescue industries.
www.sherrilltree.com
Give a person a match and they'll be warm for a minute, but light them on fire and they'll be warm for the rest of their life. =) |
|
MindHacker

Location: Suburbs of DC
Gender: Male
If you spot a terrorist arrow, pin it to the wall with your shoulder.
| | Re: a guide to basic rope work
<Reply # 9 on 1/27/2010 5:22 AM >
| | | | Posted by Therrin
My personal favorite for LONG rapells, is my descending rack. (aka rescue rack). It can handle dual ropes, or large diameter ropes like my 5/8" rigging line. Also it's designed to be easily tied off, can vary the amount of friction you apply by popping "hyper bars" in and out, doesnt twist the rope, and is rated to 20,000lbs static load limit.
|
I've always always wanted an excuse to use one of these, but... can you adjust the friction while descending, or is it more of a pick a level and trust that it's the right one? Also, ever done an Australian rappels? with the rack?
"That's just my opinion. I would, however, advocate for explosive breaching, since speed and looking cool are both concerns in my job."-Wilkinshire |
|
Therrin
This member has been banned. See the banlist for more information.
Location: North of Chicago, IL
Gender: Male
*Therrin puts on the penguin-suit
| | | Re: a guide to basic rope work
<Reply # 10 on 1/27/2010 5:37 AM >
| | | | LOL, by Australian do you mean "upside-down"?
- Not with the rack with other descenders I've done that, it's actually pretty fun.
In theory, (or in practice if you know your techniques), you could change your descent friction with a rack while in mid-rappel. Here let me put up a picture.
See how 3 of the hyper bars are notched along one running leg of the U-shape? Those are the ones you can pop in and out to create more/less friction. You snap one open, stick a bight of rope up through and around the top, and snap it back into place, so that the bight of rope is pulling the notched bar against the U-bar. The end of the U is where you'd clip in to your harness.
This is a device you want to get somewhat comfortable using BEFORE taking it to a shaft or other UE-type of spot. If you run the bitter end out of the top of the device instead of the bottom, you'll simple collapse all the bars against eachother and it'll seize up pretty tight. (the first mistake I made with it, lol). Once you get that part figured out, then you play around a bit with the different friction bars and what kind of rappel speed you like. With all the bars in place and my body weight (180lbs @ 6'6") I dont even need a brake hand on the line, it will just lower me down at a nice slooow rate of travel. For quick rapel I'd only use one bar looped in. The rack also dissipates heat very nicely for quick long rappels.
Getting back to your question though. Technically, yes, you could change it up while in mid descent, but you'd have to brake yourself; then either stick an ascender on the line below you with a footloop to unwieght the line, or tie a hitch around your foot so you can stand up and achieve the same goal. Not exactly a smooth operation, but yes, it's possible.
BTW, they also make racks which are considerably smaller than the one I have. Some are only 3, 4, or 5 bar, with or without single or double tie-offs.
www.karstsports.com has a large selection of this type of equipment.
Give a person a match and they'll be warm for a minute, but light them on fire and they'll be warm for the rest of their life. =) |
|
RailGuy88
This member has been banned. See the banlist for more information.
Location: Where you're not...
Gender: Male
| | Re: a guide to basic rope work
<Reply # 11 on 1/27/2010 6:21 AM >
| | | | Kinda on the same subject: Anyone know where I can get:
- 200' of 5/8" static kernmantle rope (red, orange, or yellow)
- 200' of 1/2" nylon rope (white or dark color)
Both must have Weight Load Limit (WLL) of at least 22kN (5,000 lbs). WLL is 10% of Min Breaking Strength (MBS). Prefer to pay under $150 for each line.
Going where others can't... |
|
musket boy
Location: Maui
Gender: Male
It smells like your grandpa and your feet stick to the floor
| | | | Re: a guide to basic rope work
<Reply # 12 on 1/27/2010 6:38 AM >
| | | | Posted by RailGuy88
Kinda on the same subject: Anyone know where I can get:
- 200' of 5/8" static kernmantle rope (red, orange, or yellow)
- 200' of 1/2" nylon rope (white or dark color)
Both must have Weight Load Limit (WLL) of at least 22kN (5,000 lbs). WLL is 10% of Min Breaking Strength (MBS). Prefer to pay under $150 for each line.
|
PMI 11mm static goes for about 75-80 cents a foot and is available in lengths up to 1200 feet, look around on google cuz lots of people sell it online. you can also get it at REI
edit: why would you need 5/8 that seems kinda thick
[last edit 1/27/2010 6:40 AM by musket boy - edited 1 times]
uering |
|
Therrin
This member has been banned. See the banlist for more information.
Location: North of Chicago, IL
Gender: Male
*Therrin puts on the penguin-suit
| | | Re: a guide to basic rope work
<Reply # 13 on 1/27/2010 6:48 AM >
| | | | I pm'd you.
You wont find 200' of 5/8" kernmantle construction life-rated line for less than $200. And usually not even that little unless its on a closeout special or cut off a larger spool and leftover.
The new rope I just bought was New England 5/8" double braid. 200'
15,600lb static load limit @ $245
**forgot to mention**
You live in Cali. You can get 7/16" Bluewater 2 static rope at Sport Chalet in either white or black for right around 70c/ft.
[last edit 1/27/2010 6:53 AM by Therrin - edited 1 times]
Give a person a match and they'll be warm for a minute, but light them on fire and they'll be warm for the rest of their life. =) |
|
Therrin
This member has been banned. See the banlist for more information.
Location: North of Chicago, IL
Gender: Male
*Therrin puts on the penguin-suit
| | | Re: a guide to basic rope work
<Reply # 14 on 1/27/2010 6:56 AM >
| | | | Or,
Diameter : 13mm (1/2")
Weight : 9.3 lbs per 100 ft
Color : Orange with Red tracer
Melting Point : Polyester melts @ 480 degrees F
WLL : 990 lbs
Tensile Strength : 9,900 lbs
PDF Instructions : Click Here
Fabric : Polyester
Elongation : 0.94% @ 540 lbs
200' @ $177
Give a person a match and they'll be warm for a minute, but light them on fire and they'll be warm for the rest of their life. =) |
|
RailGuy88
This member has been banned. See the banlist for more information.
Location: Where you're not...
Gender: Male
| | Re: a guide to basic rope work
<Reply # 15 on 1/27/2010 8:58 AM >
| | | | Posted by musket boy
edit: why would you need 5/8 that seems kinda thick
|
I climb towers and need 1/2" for my fisk decender, and 5/8" for my harness safety device per OSHA/ANSI regs. Comes with the territory.
Going where others can't... |
|
Therrin
This member has been banned. See the banlist for more information.
Location: North of Chicago, IL
Gender: Male
*Therrin puts on the penguin-suit
| | | Re: a guide to basic rope work
<Reply # 16 on 1/27/2010 9:24 AM >
| | | | Gotcha, yeah I PM'd you the details.
ANSI/OSHA is sometimes a pain in the ass to work with. Some shiny-ass sitting in an office writes up all these rules and they've never even done the work before. Alot of the stuff they guideline is pretty decent but some of it's just total crap.
What kind of connectors are you spec'd for using?
Give a person a match and they'll be warm for a minute, but light them on fire and they'll be warm for the rest of their life. =) |
|
RailGuy88
This member has been banned. See the banlist for more information.
Location: Where you're not...
Gender: Male
| | Re: a guide to basic rope work
<Reply # 17 on 1/27/2010 10:53 PM >
| | | | Posted by Therrin
What kind of connectors are you spec'd for using?
|
?? Not understanding your question.
Going where others can't... |
|
\/adder

Location: DunkarooLand
Gender: Male

I'm the worst of the best but I'm in this race.
| | | Re: a guide to basic rope work
<Reply # 18 on 1/27/2010 11:15 PM >
| | | | Posted by RailGuy88
my fisk decender
|

$150 new on amazon? MSRP $299?
I think I'll stick with a Petzl Pirana

I think all the safety rules/regulations are why I couldn't take working in your industry ... all the safety sucks the fun out of it. 
You should check here:
http://www.nettechdi.com/
^ These guys offer some pretty reasonable prices.
http://www.nettech...antle-Safety-Rope/
"No risk, no reward, no fun."
"Go all the way or walk away"
escensi omnis... |
|
RailGuy88
This member has been banned. See the banlist for more information.
Location: Where you're not...
Gender: Male
| | Re: a guide to basic rope work
<Reply # 19 on 1/27/2010 11:17 PM >
| | | |
That's her! ... It's really quite fun once you get past the cost of the equipment. Plus after working 1-2 job sites, it all pays off anyhow.
Going where others can't... |
|
|
|
All content and images copyright © 2002-2024 UER.CA and respective creators. Graphical Design by Crossfire.
To contact webmaster, or click to email with problems or other questions about this site:
UER CONTACT
View Terms of Service |
View Privacy Policy |
Server colocation provided by Beanfield
This page was generated for you in 140 milliseconds. Since June 23, 2002, a total of 739490896 pages have been generated.
|
|